Before you get started using ColdFusion MX reporting, you must install the Report Builder.
After you install the Report Builder, start it by opening the Report Builder icon in the location you specified at installation time (for example, the desktop or the Start menu).
The first time you open the Report Builder, the Server Setup Wizard runs. After you complete the Server Setup Wizard, select File > New from the menu bar to define a new report using the Report Creation Wizard. For more information, see Basic steps for creating reports.
This section contains the following discussions:
You can access the Report Builder installer from the following places:
The ColdFusion MX installation Go to the webroot/CFIDE/installers directory.
The ColdFusion MX CD Use the CD Browser to select the ColdFusion MX reporting option.
The Macromedia website Go to www.macromedia.com/software/coldfusion/reporting/.
When you install the Report Builder, it also registers Windows DLLs that are used by RDS. If these DLLs fail to register properly, the Report Builder generates errors at startup and when using RDS.
The first time you start the Report Builder, it runs the Setup Wizard. The Setup Wizard prompts you to define default settings for an associated ColdFusion MX server. These settings include the following:
After running the Setup Wizard, the Report Gallery dialog box appears. When you click the Using a Report Wizard radio button, the Report Builder runs the Report Creation Wizard, which prompts you for information and generates a complete report definition automatically.
For more information on the Report Creation Wizard, see Using the Report Creation Wizard.
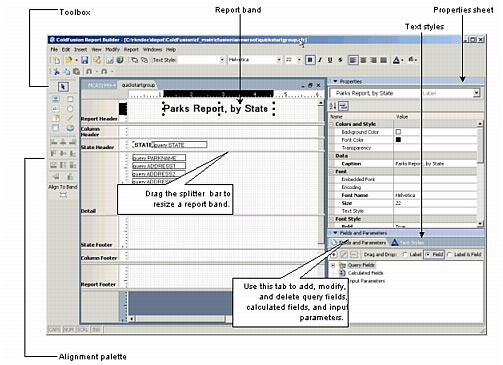
The Report Builder user interface includes the following areas:
Toolbox Contains nonvariable elements placed in a report, including text, shapes, images, subreports, and graphs. To use toolbox elements, click on the element, and then click and drag in the report band to define the element's size. After you place an element on a report band, you can modify its appearance and behavior by using the Properties sheet.
Alignment palette Use Control-click or Shift-click to select multiple elements in a report band, and then click the appropriate alignment icon. You can also use Control-A to select all elements in a report band.
Report bands Place toolbox elements, query fields, and calculated fields on report bands. The default report bands are report header, page header, column header, detail, column footer, page footer, report footer, and watermark. Page header, page footer, and watermark are closed by default; to open them drag one of the adjacent splitter bars. To define additional bands for groups, select Report > Group Management.
Properties panel Contains display and report characteristics for the selected field. To change a property value, type or select a new value, and press Enter. For complete information on properties, see the online Help.
Fields and parameters panel Contains items for query fields, input parameters, and calculated fields. Use the add, edit, and delete icons to manage these fields. After you define a field, drag the field name to add the field, its associated label, or both, to a report band.
Text styles tool window Contains the text styles that you define for a report. Use the add, edit, and delete icons to manage text styles. After you define text styles, you apply them to text elements on the report instead of specifying font, font size, and so on, for each individual text element. If your report layout, platform, or font availability requirements change, you can modify the text style to apply the changes throughout the report. Additionally, you can specify that a text style is the report's default font and the Report Builder applies it to all text elements you add to a report.
The following figure shows the main areas of the Report Builder user interface:
The View menu lets you control whether toolboxes and tool windows appear. Additionally, you can click on a tool window's title to undock it and drag it to another area of the screen. To re-dock a tool window, drag it to the side or corner until a rectangle appears, and then release the mouse button.
For more information, see Common reporting tasks and techniques and the online Help.